Did your LED lamp burn out? Don’t throw it away! This simple trick can fix it in minutes—with just a pencil! ✏️ No need to spend money on new bulbs when you can repair them for free at home.
🛠 What You’ll Need:
✔️ A burnt-out LED lamp 💡
✔️ A pointed object (small screwdriver or knife) 🔧
✔️ A pencil ✏️ (yes, really!)
✔️ Tweezers wrapped in electrical tape
✔️ A marker 🖊 (to identify the faulty LED)
🔧 Step-by-Step Guide to Fixing Your Lamp:
1️⃣ Remove the Lamp Cover
- Gently pry off the acrylic cover using a pointed tool.
- This part isn’t glass—just plastic, so it comes off easily.
2️⃣ Identify the Faulty LED
- Plug the lamp in and turn it on.
- Use the tweezers wrapped in electrical tape to touch each yellow LED on the circuit.
- When the lamp lights up, you’ve found the faulty LED! 🎯
- Mark it with a pen so you don’t lose track.
3️⃣ Remove the Burnt-Out LED
- Unplug the lamp before proceeding!
- Use a sharp tool to scrape off the faulty LED, leaving only the metal contacts underneath.
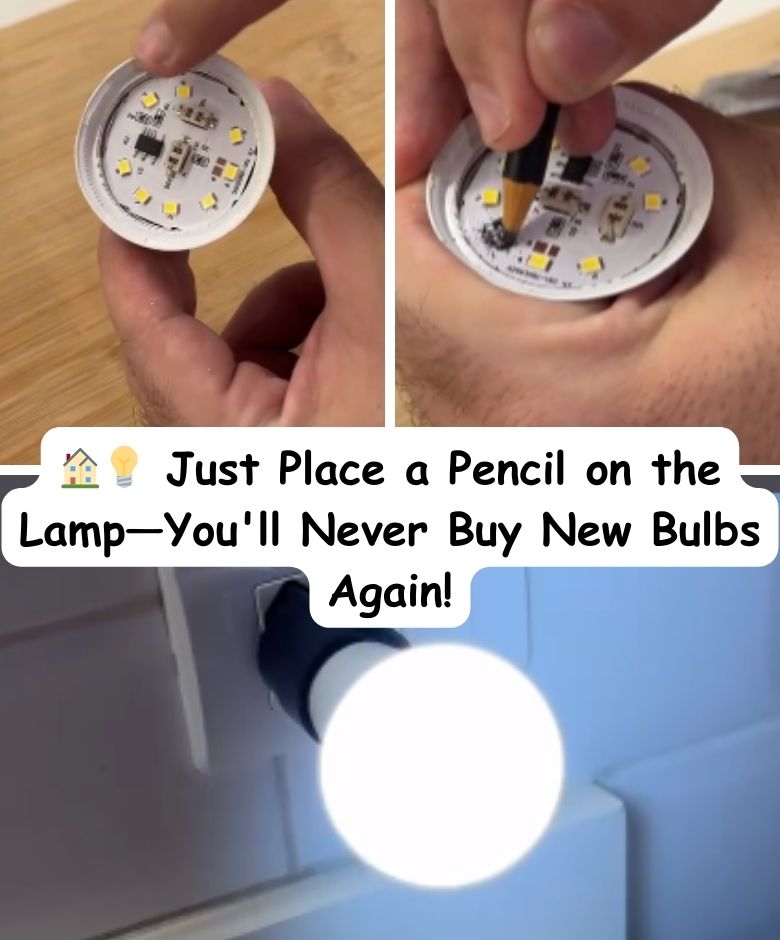
4️⃣ Use a Pencil to Fix the Contact
- Now for the amazing trick—just rub a pencil on the contacts!
- Graphite in the pencil is a conductor, so it restores the connection between the working LEDs.
- Make sure to apply a good amount so it lasts longer.
5️⃣ Reassemble and Test
- Plug the lamp back in and watch the magic happen! Your lamp is working again! ✨
- Snap the acrylic cover back in place, and you’re good to go.
💡 Why This Trick Works:
✔️ Graphite conducts electricity and acts as a bridge between the working LEDs.
✔️ No need for expensive repairs—a simple pencil does the job!
✔️ Extends the life of your LED bulb, saving you money!
✔️ Quick and easy fix—no special tools needed!
⚠️ Note: This is a temporary fix for emergencies. If you rely on this lamp for long-term use, consider replacing the faulty LED or getting a new bulb.
💬 Tried this trick? Let me know how it worked for you! Share this tip with friends—they’ll never throw away an LED bulb again! 🔄💡
See you in the next tip! 👋😃